DIY Ottoman

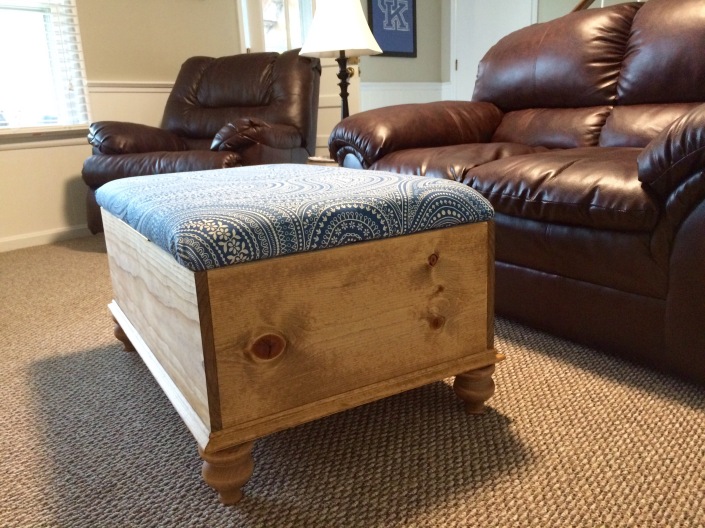
Hello everyone! Yes I know it’s been awhile….life happened and we’ve been busy and I have made a post in about 2 years! Since then a lot has changed. Handsome and I have bought a new house and taken on MANY diy projects. The newest project is an ottoman with storage. In our new house we have a basement that we recently remodeled.
Needless to say we’ve done ALOT of work!! Anyways….now we want to move our relaxtion spot down stairs to the UK Man Cave aka the basement….hence the reason for the ottoman with storage. 😊 I wanted to make something that serve many purposes. I wanted something to serve as a foot stool, and something we could also use for storage and something that would also be decorative and a centerpiece for the room….so that is why we came up with the ottoman. You know me, I had to add a little female classy to the UK Man Cave so I found this paisley UK blue fabric at a fabric store and decided to go with that to just add a little pizazz to the room!
Step 1: Gathering Materials
So we started by gathering our materials so we headed to our home away from home…..Lowes! Seriously…the people there know us by name 😀 plus Handsome LOVES Lowes, like I love shoe shopping! Isn’t he so cute?!? Such a serious thinker!!!!
Materials:
3 1×12 @ 4 feet long
10 feet of trim
4 bun feet
4 bun feet plates
2 pieces of ½ inch plywood 36 x 24
1 piano hinge
1 ¼ inch Course Pocket Hole Screws
Golden Oak wood stain
2 yards of fabric
1 piece of foam – same size as your plywood 24 x 36
Batting (enough to go over your foam and cover your edges)
We started with the two pieces of the 1 x 12, and cut 4 pieces. I cut 2 pieces at 36 inches and 2 at 22.5 inches.
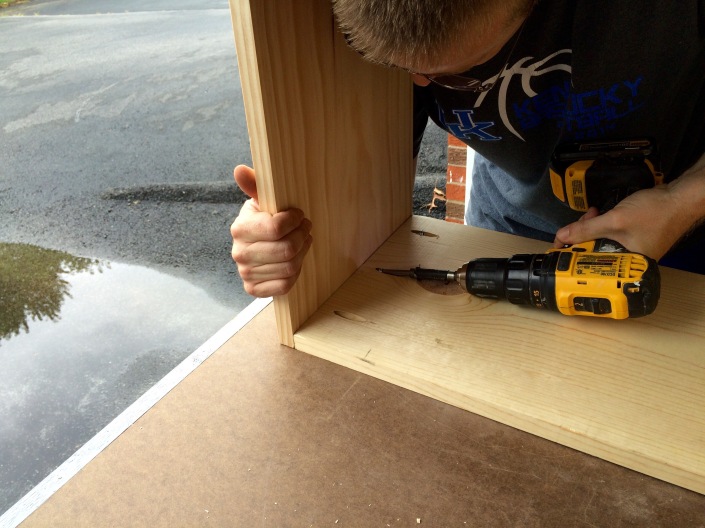
Then Handsome drilled 3 pocket holes in each end of the 22.5 inch boards.

Then he screwed those boards into the 36 inch boards with the Pocket Hole Screws, attaching them together to make a box. Yay!

Then he nailed 1 of the ½ inch pieces of plywood onto the bottom of the box.

Then he nailed on the trim around the edges of the bottom on the box and screwed on the bun feet plates in each corner.
 The next step was to stain the base. I am a HUGE fan of walnut stain, but with this project we used Golden Oak because Handsome also re-did the basement stairs with the same stain, plus we have some other pieces that have the same stain and we wanted it to all match. We did not paint the inside of the ottoman, we kind of like it that way better, and we were going for the rustic look. I am on the lookout for a sachet to put in there so that our blankets don’t smell like plywood!
After the stain had a few hours to dry, we flipped the ottoman over and screwed the bun feet into the plates.

Ok so next was putting the fabric on the lid (the other piece of ½ inch plywood) which was my job, well it was a hard job! Probably the hardest job out of the entire project. I’m just joking, I was a little dramatic about this part because the first fabric I bought I DID NOT LIKE!!! So I was not happy with the outcome, but anyways, I started by laying out my fabric, then laying the batting on top of that, then laying foam on top of that, you see where I am going here, just keeping laying things down on the floor, one thing on top of another. Then finally laying the plywood down on top of everything, making sure everything is centered. Ok so this next step is very important, do what I like to call a trial run by pulling your fabric with the batting and foam around the edges of the plywood and flip it over to make sure that the design of the fabric is centered on the plywood and you like the way it looks before stapling it down. I made the mistake of just stapling it and then when I was finished the fabric was not centered and I had to pull out all of the staples and redo it! Not a happy person!!!!

So next make sure everything is lined up correctly and pull your fabric with the batting and foam coming over the edge of the plywood a little bit and staple into the plywood. You want to pull somewhat tight, but not too tight. Work on one side and move to the opposite end before moving to the other sides. Now on the corners, I did those last, I just grabbed the remaining fabric, pulled it and kinda twisted it at the same time. I am sure there was a better way of doing this, but like I said this was the hardest part of the project and once I got to this step I was wore out and I just wanted to finish! It was like playing twister with a big box in the middle trying to maneuver your way around it!!! LOL

Then I trimmed back the excess fabric, and took the left over fabric and folded the edges in and stapled it to the inside of the plywood to just give it more of a finishing look.
 Handsome attached the lid to the bottom with the piano hinge…kinda tricky! This is definitely a two person job!


Needless to say by this point I was tired and Ella was pooped, we found her napping on the garage floor 😊

We finally finished our project and we had a ottoman with storage!!!

Hope you enjoy reading the post and now you get started making something 😘
Adapted from http://www.autumnostlund.com/search?updated-max=2013-02-15T13:55:00-08:00&max-results=1&start=1&by-date=false


